Junior Cycle Maths

Geometry and trigonometry · Chapter 28

Compass and straightedge constructions

Clear notes, 3 worked examples and 1 questions to try.

01 · Understand the idea

The essentials

Key terms

Bisect
Divide into two equal parts.
Locus
The set of points satisfying a condition.
Construction arc
A compass mark showing equal distances.

Key ideas

  • Use a sharp pencil, compass and straightedge. Leave construction arcs visible so your method can be seen.
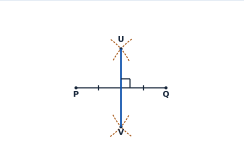
  • A perpendicular bisector uses equal-radius arcs from both endpoints; join the arc intersections.
  • An angle bisector uses an arc from the vertex, then equal-radius arcs from its two intersections with the arms.
  • For a perpendicular from a point to a line, create two points on the line equally distant from the given point; join the given point to the second arc intersection.
  • To divide a segment into equal parts, mark equal steps on an auxiliary ray and use parallel lines.
  • Construct triangles from sufficient measurements; distinguish SSS, SAS, ASA and RHS. An SSA description can be ambiguous.
Perpendicular bisector: equal-radius arcs from A and B meet at P and Q. Line PQ bisects AB at a right angle.

Construction videos 1–15

Choose a number below, or open the matching construction to see its video and written steps. Clips are from TheMathsTutor.ie unless otherwise marked and open on YouTube.

1 · 2 · 3 (HL only) · 4 · 5 · 6 (MathsTulla) · 7 (MathsTulla) (HL only) · 8 · 9 · 10 · 11 · 12 · 13 · 14 · 15

All 15 construction methods

Practise these with your instruments. Constructions 3 and 7 are Higher Level additions.

01 · Bisect an angle

Watch construction 1 (TheMathsTutor.ie)

1. Bisect an angle

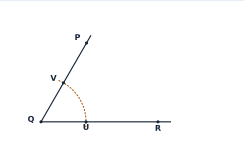
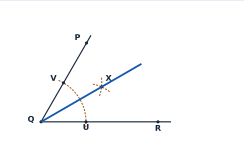
Given angle PQR with vertex Q.

  1. Step 1

    From Q, draw one arc cutting both arms at U and V.

    1. Bisect an angle, step 1: From Q, draw one arc cutting both arms at U and V.
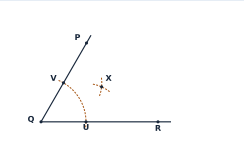
  2. Step 2

    With one compass width, draw arcs from U and V that cross inside the angle at X.

    1. Bisect an angle, step 2: With one compass width, draw arcs from U and V that cross inside the angle at X.
  3. Step 3

    Draw the ray from Q through X.

    1. Bisect an angle, step 3: Draw the ray from Q through X.

Check: The two angles on either side of QX are equal.

02 · Bisect a segment at right angles

Watch construction 2 (TheMathsTutor.ie)

2. Perpendicular bisector

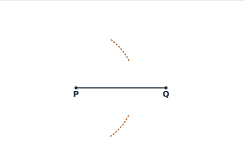
Given segment PQ.

  1. Step 1

    Open the compass wider than half of PQ. From P, draw arcs above and below PQ.

    2. Perpendicular bisector, step 1: Open the compass wider than half of PQ. From P, draw arcs above and below PQ.
  2. Step 2

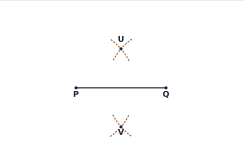
    Keep the same width. Repeat from Q, crossing the first arcs at U and V.

    2. Perpendicular bisector, step 2: Keep the same width. Repeat from Q, crossing the first arcs at U and V.
  3. Step 3

    Draw UV through the two intersections.

    2. Perpendicular bisector, step 3: Draw UV through the two intersections.

Check: The new line meets PQ at 90° and bisects it.

03 · Perpendicular through an external point — Higher Level only

Watch construction 3 (TheMathsTutor.ie)

3. Perpendicular through an external point

HIGHER LEVEL ONLY · Given a point R outside line ℓ.

  1. Step 1

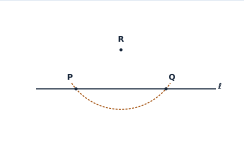
    From R, draw an arc wide enough to cut ℓ twice. Label the cuts P and Q.

    3. Perpendicular through an external point, step 1: From R, draw an arc wide enough to cut ℓ twice. Label the cuts P and Q.
  2. Step 2

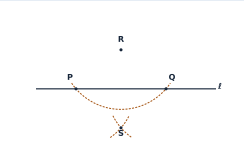
    Keep the same radius. From P and Q draw arcs meeting on the far side of ℓ at S.

    3. Perpendicular through an external point, step 2: Keep the same radius. From P and Q draw arcs meeting on the far side of ℓ at S.
  3. Step 3

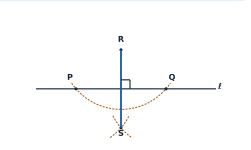
    Draw RS and extend it to the line.

    3. Perpendicular through an external point, step 3: Draw RS and extend it to the line.

Check: R and S are both equidistant from P and Q, so RS is their perpendicular bisector.

04 · Perpendicular at a point on a line

Watch construction 4 (TheMathsTutor.ie)

4. Perpendicular at a point on a line

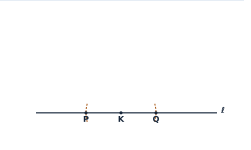
Given a point K on line ℓ.

  1. Step 1

    Use one radius from K to mark P and Q on the line, the same distance from K.

    4. Perpendicular at a point on a line, step 1: Use one radius from K to mark P and Q on the line, the same distance from K.
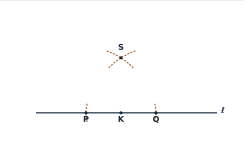
  2. Step 2

    Increase the width. From P and Q draw equal-radius arcs crossing at S.

    4. Perpendicular at a point on a line, step 2: Increase the width. From P and Q draw equal-radius arcs crossing at S.
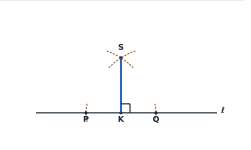
  3. Step 3

    Draw KS.

    4. Perpendicular at a point on a line, step 3: Draw KS.

Check: KS is perpendicular to ℓ at K.

05 · Parallel through a given point

Watch construction 5 (TheMathsTutor.ie)

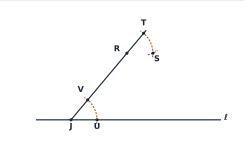
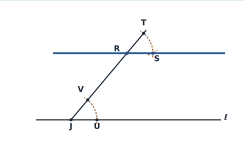
5. Parallel through a point

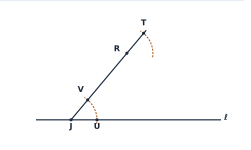
Given line ℓ and point R outside it.

  1. Step 1

    Draw a transversal through R meeting ℓ at J. Use the same radius at J and R to draw the two arcs shown.

    5. Parallel through a point, step 1: Draw a transversal through R meeting ℓ at J. Use the same radius at J and R to draw the two arcs shown.
  2. Step 2

    Set the compass to chord UV. With centre T, mark S on the upper arc on the same side of the transversal as U.

    5. Parallel through a point, step 2: Set the compass to chord UV. With centre T, mark S on the upper arc on the same side of the transversal as U.
  3. Step 3

    Draw the line through R and S.

    5. Parallel through a point, step 3: Draw the line through R and S.

Check: The copied corresponding angles are equal, so RS is parallel to ℓ.

06 · Divide a segment into two or three equal parts

Watch construction 6 (MathsTulla)

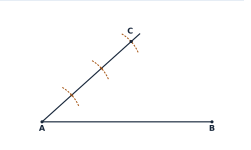
6. Divide a segment into two or three

Given segment AB. The example shows three parts.

  1. Step 1

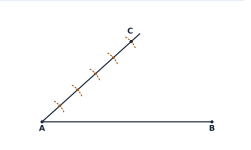
    Draw a slanted ray from A. Step one compass width along it 3 times. Call the last mark C.

    6. Divide a segment into two or three, step 1: Draw a slanted ray from A. Step one compass width along it 3 times. Call the last mark C.
  2. Step 2

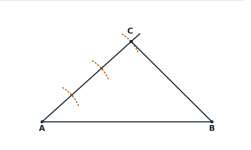
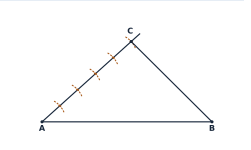
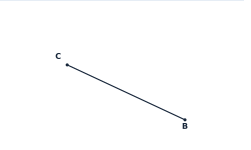
    Join C to B. This is the direction for all the parallel lines in the next step.

    6. Divide a segment into two or three, step 2: Join C to B. This is the direction for all the parallel lines in the next step.
  3. Step 3

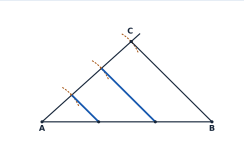
    Use Construction 5 or slide a set square to draw a parallel to CB through each earlier mark. Their intersections divide AB equally.

    6. Divide a segment into two or three, step 3: Use Construction 5 or slide a set square to draw a parallel to CB through each earlier mark. Their intersections divide AB equally.

Check: For two parts use two steps; for any n use n steps. The intercept theorem gives equal parts on AB.

07 · Divide a segment into n equal parts — Higher Level only

Watch construction 7 (MathsTulla)

7. Divide a segment into n equal parts

HIGHER LEVEL ONLY · Given segment AB. The example shows n = 5.

  1. Step 1

    Draw a slanted ray from A. Step one compass width along it 5 times. Call the last mark C.

    7. Divide a segment into n equal parts, step 1: Draw a slanted ray from A. Step one compass width along it 5 times. Call the last mark C.
  2. Step 2

    Join C to B. This is the direction for all the parallel lines in the next step.

    7. Divide a segment into n equal parts, step 2: Join C to B. This is the direction for all the parallel lines in the next step.
  3. Step 3

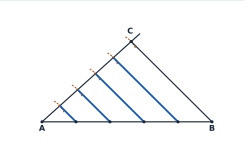
    Use Construction 5 or slide a set square to draw a parallel to CB through each earlier mark. Their intersections divide AB equally.

    7. Divide a segment into n equal parts, step 3: Use Construction 5 or slide a set square to draw a parallel to CB through each earlier mark. Their intersections divide AB equally.

Check: For two parts use two steps; for any n use n steps. The intercept theorem gives equal parts on AB.

08 · Mark a given length on a ray

Watch construction 8 (TheMathsTutor.ie)

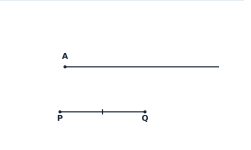
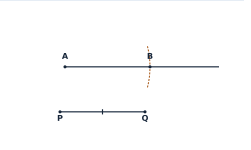
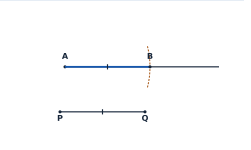
8. Copy a length onto a ray

Given segment PQ and a ray starting at A.

  1. Step 1

    Set the compass width to PQ without measuring it with a ruler.

    8. Copy a length onto a ray, step 1: Set the compass width to PQ without measuring it with a ruler.
  2. Step 2

    Keeping the width fixed, place the point at A and mark the ray at B.

    8. Copy a length onto a ray, step 2: Keeping the width fixed, place the point at A and mark the ray at B.
  3. Step 3

    Identify the copied segment AB.

    8. Copy a length onto a ray, step 3: Identify the copied segment AB.

Check: AB and PQ have the same length.

09 · Draw a given angle

Watch construction 9 (TheMathsTutor.ie)

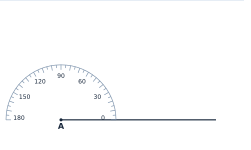
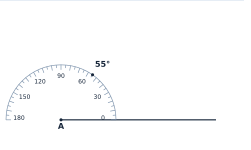
9. Construct an angle of a given size

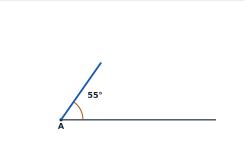
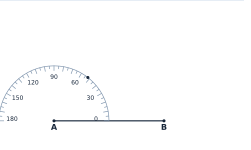
Example: construct an angle of 55° on the given ray.

  1. Step 1

    Place the protractor centre on A and align the zero ray with the given ray.

    9. Construct an angle of a given size, step 1: Place the protractor centre on A and align the zero ray with the given ray.
  2. Step 2

    Read from that zero. Mark the 55° direction.

    9. Construct an angle of a given size, step 2: Read from that zero. Mark the 55° direction.
  3. Step 3

    Remove the protractor and draw the second ray through the mark.

    9. Construct an angle of a given size, step 3: Remove the protractor and draw the second ray through the mark.

Check: Read the scale that starts at 0° on the given ray.

10 · SSS triangle

Watch construction 10 (TheMathsTutor.ie)

10. Triangle from three sides (SSS)

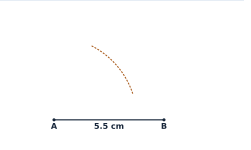
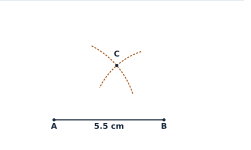
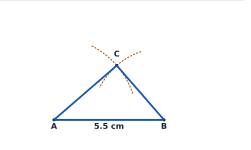
Example: AB = 5.5 cm, AC = 4.15 cm and BC = 3.6 cm.

  1. Step 1

    Copy AB. With centre A and compass width AC, draw the first arc.

    10. Triangle from three sides (SSS), step 1: Copy AB. With centre A and compass width AC, draw the first arc.
  2. Step 2

    From B draw an arc with radius BC. Label its intersection with the first arc C.

    10. Triangle from three sides (SSS), step 2: From B draw an arc with radius BC. Label its intersection with the first arc C.
  3. Step 3

    Join A to C and B to C. Leave both arcs visible.

    10. Triangle from three sides (SSS), step 3: Join A to C and B to C. Leave both arcs visible.

Check: The same three lengths also give a reflected triangle on the other side of AB.

11 · SAS triangle

Watch construction 11 (TheMathsTutor.ie)

11. Triangle from two sides and included angle (SAS)

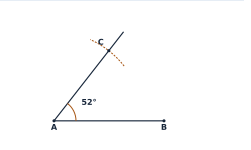
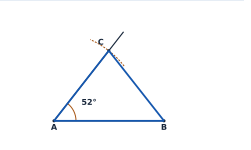
Example: AB = 5.5 cm, AC = 4.45 cm and angle A = 52°.

  1. Step 1

    Copy AB. At A, use a protractor to mark a ray 52° from AB.

    11. Triangle from two sides and included angle (SAS), step 1: Copy AB. At A, use a protractor to mark a ray 52° from AB.
  2. Step 2

    Open the compass to AC. With centre A, cut the new ray at C.

    11. Triangle from two sides and included angle (SAS), step 2: Open the compass to AC. With centre A, cut the new ray at C.
  3. Step 3

    Join C to B to complete the triangle.

    11. Triangle from two sides and included angle (SAS), step 3: Join C to B to complete the triangle.

Check: The 52° angle is between the two given sides.

12 · ASA triangle

Watch construction 12 (TheMathsTutor.ie)

12. Triangle from two angles and included side (ASA)

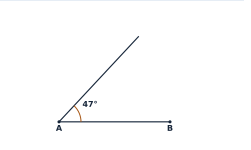
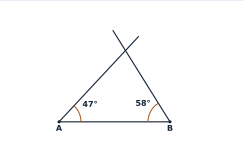
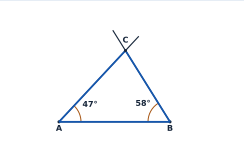
Example: AB = 5.55 cm, angle A = 47° and angle B = 58°.

  1. Step 1

    Copy AB. At A construct a 47° ray measured from AB.

    12. Triangle from two angles and included side (ASA), step 1: Copy AB. At A construct a 47° ray measured from AB.
  2. Step 2

    At B construct a 58° ray measured from BA, on the same side of AB.

    12. Triangle from two angles and included side (ASA), step 2: At B construct a 58° ray measured from BA, on the same side of AB.
  3. Step 3

    Label their intersection C. The three points determine triangle ABC.

    12. Triangle from two angles and included side (ASA), step 3: Label their intersection C. The three points determine triangle ABC.

Check: The third angle is 75°. At B start from BA, not from the extension to the right.

13 · Right triangle from hypotenuse and one side

Watch construction 13 (TheMathsTutor.ie)

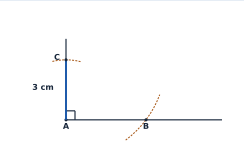
13. Right triangle from hypotenuse and a leg (RHS)

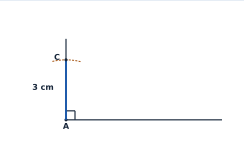
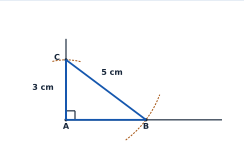
Example: right angle at A, AC = 3 cm and BC = 5 cm.

  1. Step 1

    Draw perpendicular rays at A and mark the 3 cm leg AC on one ray.

    13. Right triangle from hypotenuse and a leg (RHS), step 1: Draw perpendicular rays at A and mark the 3 cm leg AC on one ray.
  2. Step 2

    With centre C and radius 5 cm, cut the other ray at B.

    13. Right triangle from hypotenuse and a leg (RHS), step 2: With centre C and radius 5 cm, cut the other ray at B.
  3. Step 3

    Join B to C.

    13. Right triangle from hypotenuse and a leg (RHS), step 3: Join B to C.

Check: The hypotenuse BC is opposite the right angle.

14 · Right triangle from a side and an acute angle

Watch construction 14 (TheMathsTutor.ie)

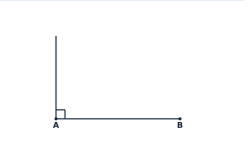
14a. Right triangle: given the adjacent leg

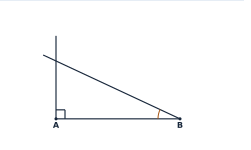
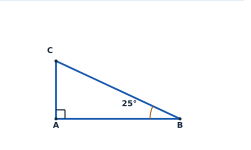
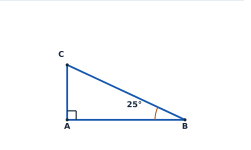
Example: AB = 6.2 cm and angle B = 25°.

  1. Step 1

    Draw AB and construct a perpendicular ray at A.

    14a. Right triangle: given the adjacent leg, step 1: Draw AB and construct a perpendicular ray at A.
  2. Step 2

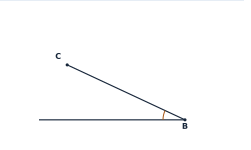
    At B, measure 25° from BA and draw the ray on the side of the perpendicular shown.

    14a. Right triangle: given the adjacent leg, step 2: At B, measure 25° from BA and draw the ray on the side of the perpendicular shown.
  3. Step 3

    The two rays meet at C.

    14a. Right triangle: given the adjacent leg, step 3: The two rays meet at C.

Check: The acute angles are B = 25° and C = 65°; the right angle is at A.

14b. Right triangle: given the opposite leg

Example: AC = 3 cm and angle B = 25°.

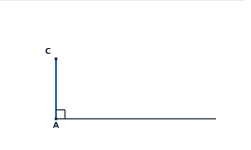
  1. Step 1

    Draw the 3 cm leg AC. At A, construct the perpendicular ray AB.

    14b. Right triangle: given the opposite leg, step 1: Draw the 3 cm leg AC. At A, construct the perpendicular ray AB.
  2. Step 2

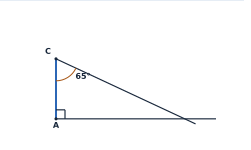
    At C, measure 65° from CA and draw the ray towards the perpendicular.

    14b. Right triangle: given the opposite leg, step 2: At C, measure 65° from CA and draw the ray towards the perpendicular.
  3. Step 3

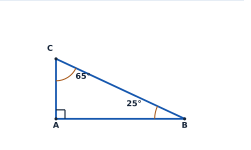
    The two rays meet at B. The angle at B is 25°.

    14b. Right triangle: given the opposite leg, step 3: The two rays meet at B. The angle at B is 25°.

Check: The acute angles are B = 25° and C = 65°; the right angle is at A.

14c. Right triangle: given the hypotenuse

Example: BC = 6.5 cm and angle B = 25°.

  1. Step 1

    Draw the 6.5 cm hypotenuse BC.

    14c. Right triangle: given the hypotenuse, step 1: Draw the 6.5 cm hypotenuse BC.
  2. Step 2

    At B, draw ray BA at 25° below BC as shown.

    14c. Right triangle: given the hypotenuse, step 2: At B, draw ray BA at 25° below BC as shown.
  3. Step 3

    Through C, construct a perpendicular to BA. Its foot is A.

    14c. Right triangle: given the hypotenuse, step 3: Through C, construct a perpendicular to BA. Its foot is A.

Check: The acute angles are B = 25° and C = 65°; the right angle is at A.

15 · Rectangle from side lengths

Watch construction 15 (TheMathsTutor.ie)

15. Rectangle from its side lengths

Example: length 5.45 cm, width 3.05 cm.

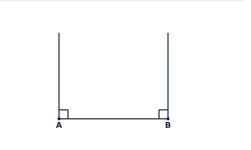
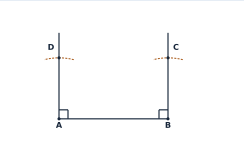
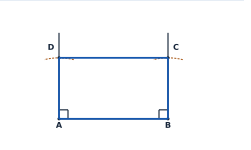
  1. Step 1

    Copy AB to the required length. Construct perpendiculars at A and B on the same side.

    15. Rectangle from its side lengths, step 1: Copy AB to the required length. Construct perpendiculars at A and B on the same side.
  2. Step 2

    Use one compass width to mark the given width at D and C.

    15. Rectangle from its side lengths, step 2: Use one compass width to mark the given width at D and C.
  3. Step 3

    Join D to C to complete the rectangle.

    15. Rectangle from its side lengths, step 3: Join D to C to complete the rectangle.

Check: Opposite sides are equal, and all four angles are right angles.

03 · Follow the working

Worked examples

Read the question first. Cover the working and decide what you would do next.

01Construct an SSS triangle

Construct a triangle ABC with AB =6\displaystyle = 6 cm, AC =5\displaystyle = 5 cm and BC =4\displaystyle = 4 cm.

Why this method? Identify the distances or angles that must be equal. Use the construction marks to show why the final line or point is correct.

  1. Draw AB of length 6\displaystyle 6 cm.
    Why?Draw the base
  2. Draw an arc centred at A with radius 5\displaystyle 5 cm.
    Why?Use the distance from A
  3. Draw an arc centred at B with radius 4\displaystyle 4 cm. Name an intersection C.
    Why?Use the distance from B
  4. Join A to C and B to C. Leave the arcs visible; either mirrored intersection gives a congruent triangle.
    Why?Complete and check
02Constructions 3 and 7

Construction 3:\displaystyle 3 : in a coordinate model, l is y=0,A=(−6,0),B=(6,0),\displaystyle y = 0 , A = \left(- 6 , 0\right) , B = \left(6 , 0\right) , and P=(0,3)\displaystyle P = \left(0 , 3\right). A circle centred at P passes through A and B. Equal-radius circles centred at A and B, each with radius AP, meet at P and again at Q. Choose the final line through P perpendicular to l, with its equal-distance reason.

Construction 3 solution. Not to scale; dashed lines are construction lines.

Why this method? Identify the distances or angles that must be equal. Use the construction marks to show why the final line or point is correct.

  1. PA =\displaystyle = PB =45\displaystyle = \sqrt{45}.
    Why?Mark two points equidistant from P on l
  2. Their other intersection is Q=(0,−3)\displaystyle Q = \left(0 , - 3\right). Thus QA =\displaystyle = QB as well as PA =\displaystyle = PB.
    Why?Keep the same radius for circles centred at A and B
  3. Draw PQ. It passes through P and is perpendicular to l; retain the construction arcs.
    Why?Draw the final line through the two equidistant points

Think about it: Which equal lengths or parallel lines make the construction exact, rather than an estimate?

03Constructions 3 and 7 — another example

Construction 7:\displaystyle 7 : divide segment AB into 5\displaystyle 5 equal parts without measuring AB. On an auxiliary ray from A, mark C1\displaystyle C 1 to C5\displaystyle C 5 with equal compass steps. Join C5\displaystyle C 5 to B. Through C3,\displaystyle C 3 , draw a parallel meeting AB at D3\displaystyle D 3. What fraction of AB is AD3\displaystyle 3?

Construction 7 solution. Not to scale; dashed lines are construction lines.

Why this method? Identify the distances or angles that must be equal. Use the construction marks to show why the final line or point is correct.

  1. There are 5\displaystyle 5 equal steps from A to C5\displaystyle C 5.
    Why?Count equal intervals, not just interior marks
  2. C3D3\displaystyle C 3D 3 is parallel to C5B\displaystyle C 5B.
    Why?Join the last ray mark to B and copy parallels
  3. AD3/\displaystyle 3 /AB =\displaystyle = AC3/\displaystyle 3 /AC5=35\displaystyle 5 = \frac{3}{5}.
    Why?Use the equal intercepts

Common mistake

Erasing the compass arcs after finishing a construction. The arcs show how the required point or line was found. Leave the useful construction marks visible; do not replace the method with a measured guess.

Exam technique

Check measurements afterwards, but use the prescribed construction method rather than measuring every angle.

Show your method, use units where appropriate and check whether the question asks for an exact or rounded answer.

04 · Try it yourself

Self-check questions

Work on paper first, then open the answer. These are practice questions, not submitted homework.

Question 1

Construction 3:\displaystyle 3 : in a coordinate model, l is y=0,A=(−3,0),B=(3,0),\displaystyle y = 0 , A = \left(- 3 , 0\right) , B = \left(3 , 0\right) , and P=(0,3)\displaystyle P = \left(0 , 3\right). A circle centred at P passes through A and B. Equal-radius circles centred at A and B, each with radius AP, meet at P and again at Q. Choose the final line through P perpendicular to l, with its equal-distance reason.

  1. Change the second compass radius and join the new intersection to P: unequal radii still guarantee a perpendicular bisector.
  2. Join P to A: any radius of the circle centred at P is perpendicular to l.
  3. Join A to B: AB is perpendicular to l because A and B lie on l.
  4. Join P to Q: both P and Q are equidistant from A and B, so PQ is the perpendicular bisector of AB.
Show answer & check
Join P to Q: both P and Q are equidistant from A and B, so PQ is the perpendicular bisector of AB.

Correct.

Watch an explanation

Videos for this chapter

Choose one explanation, pause to work an example, then return to the notes. All Maths videos →

Corbettmaths · Start here

Constructions: perpendicular bisector

The YouTube player loads only when you choose this button.

The video numbers belong to Corbettmaths. Use the construction names and the Junior Cycle construction list in our notes.
Open on YouTube ↗

Corbettmaths · Next step

Constructions: angle bisector

The YouTube player loads only when you choose this button.

The video numbers belong to Corbettmaths. Use the construction names and the Junior Cycle construction list in our notes.
Open on YouTube ↗

Corbettmaths · Next step

Constructions: triangles SSS

The YouTube player loads only when you choose this button.

The video numbers belong to Corbettmaths. Use the construction names and the Junior Cycle construction list in our notes.
Open on YouTube ↗

Corbettmaths · Next step

Constructions: perpendicular to point

The YouTube player loads only when you choose this button.

The video numbers belong to Corbettmaths. Use the construction names and the Junior Cycle construction list in our notes.
Open on YouTube ↗

Classroom resources

Open slides & animated PowerPoint →
Open full-size image ↗
Enlarged maths diagram